This article introduces immich-geodata-zh-tw, a reverse geocoding optimization for Immich built for Traditional Chinese users. Besides deep localization for Taiwan (Traditional Chinese place names and complete township/district levels), it also covers high-precision geodata and localized translations for popular Asian travel destinations such as Japan, South Korea, and Southeast Asia. Every other region falls back to the Chinese names commonly used in Taiwan, and the whole dataset is kept current by an automated update mechanism.
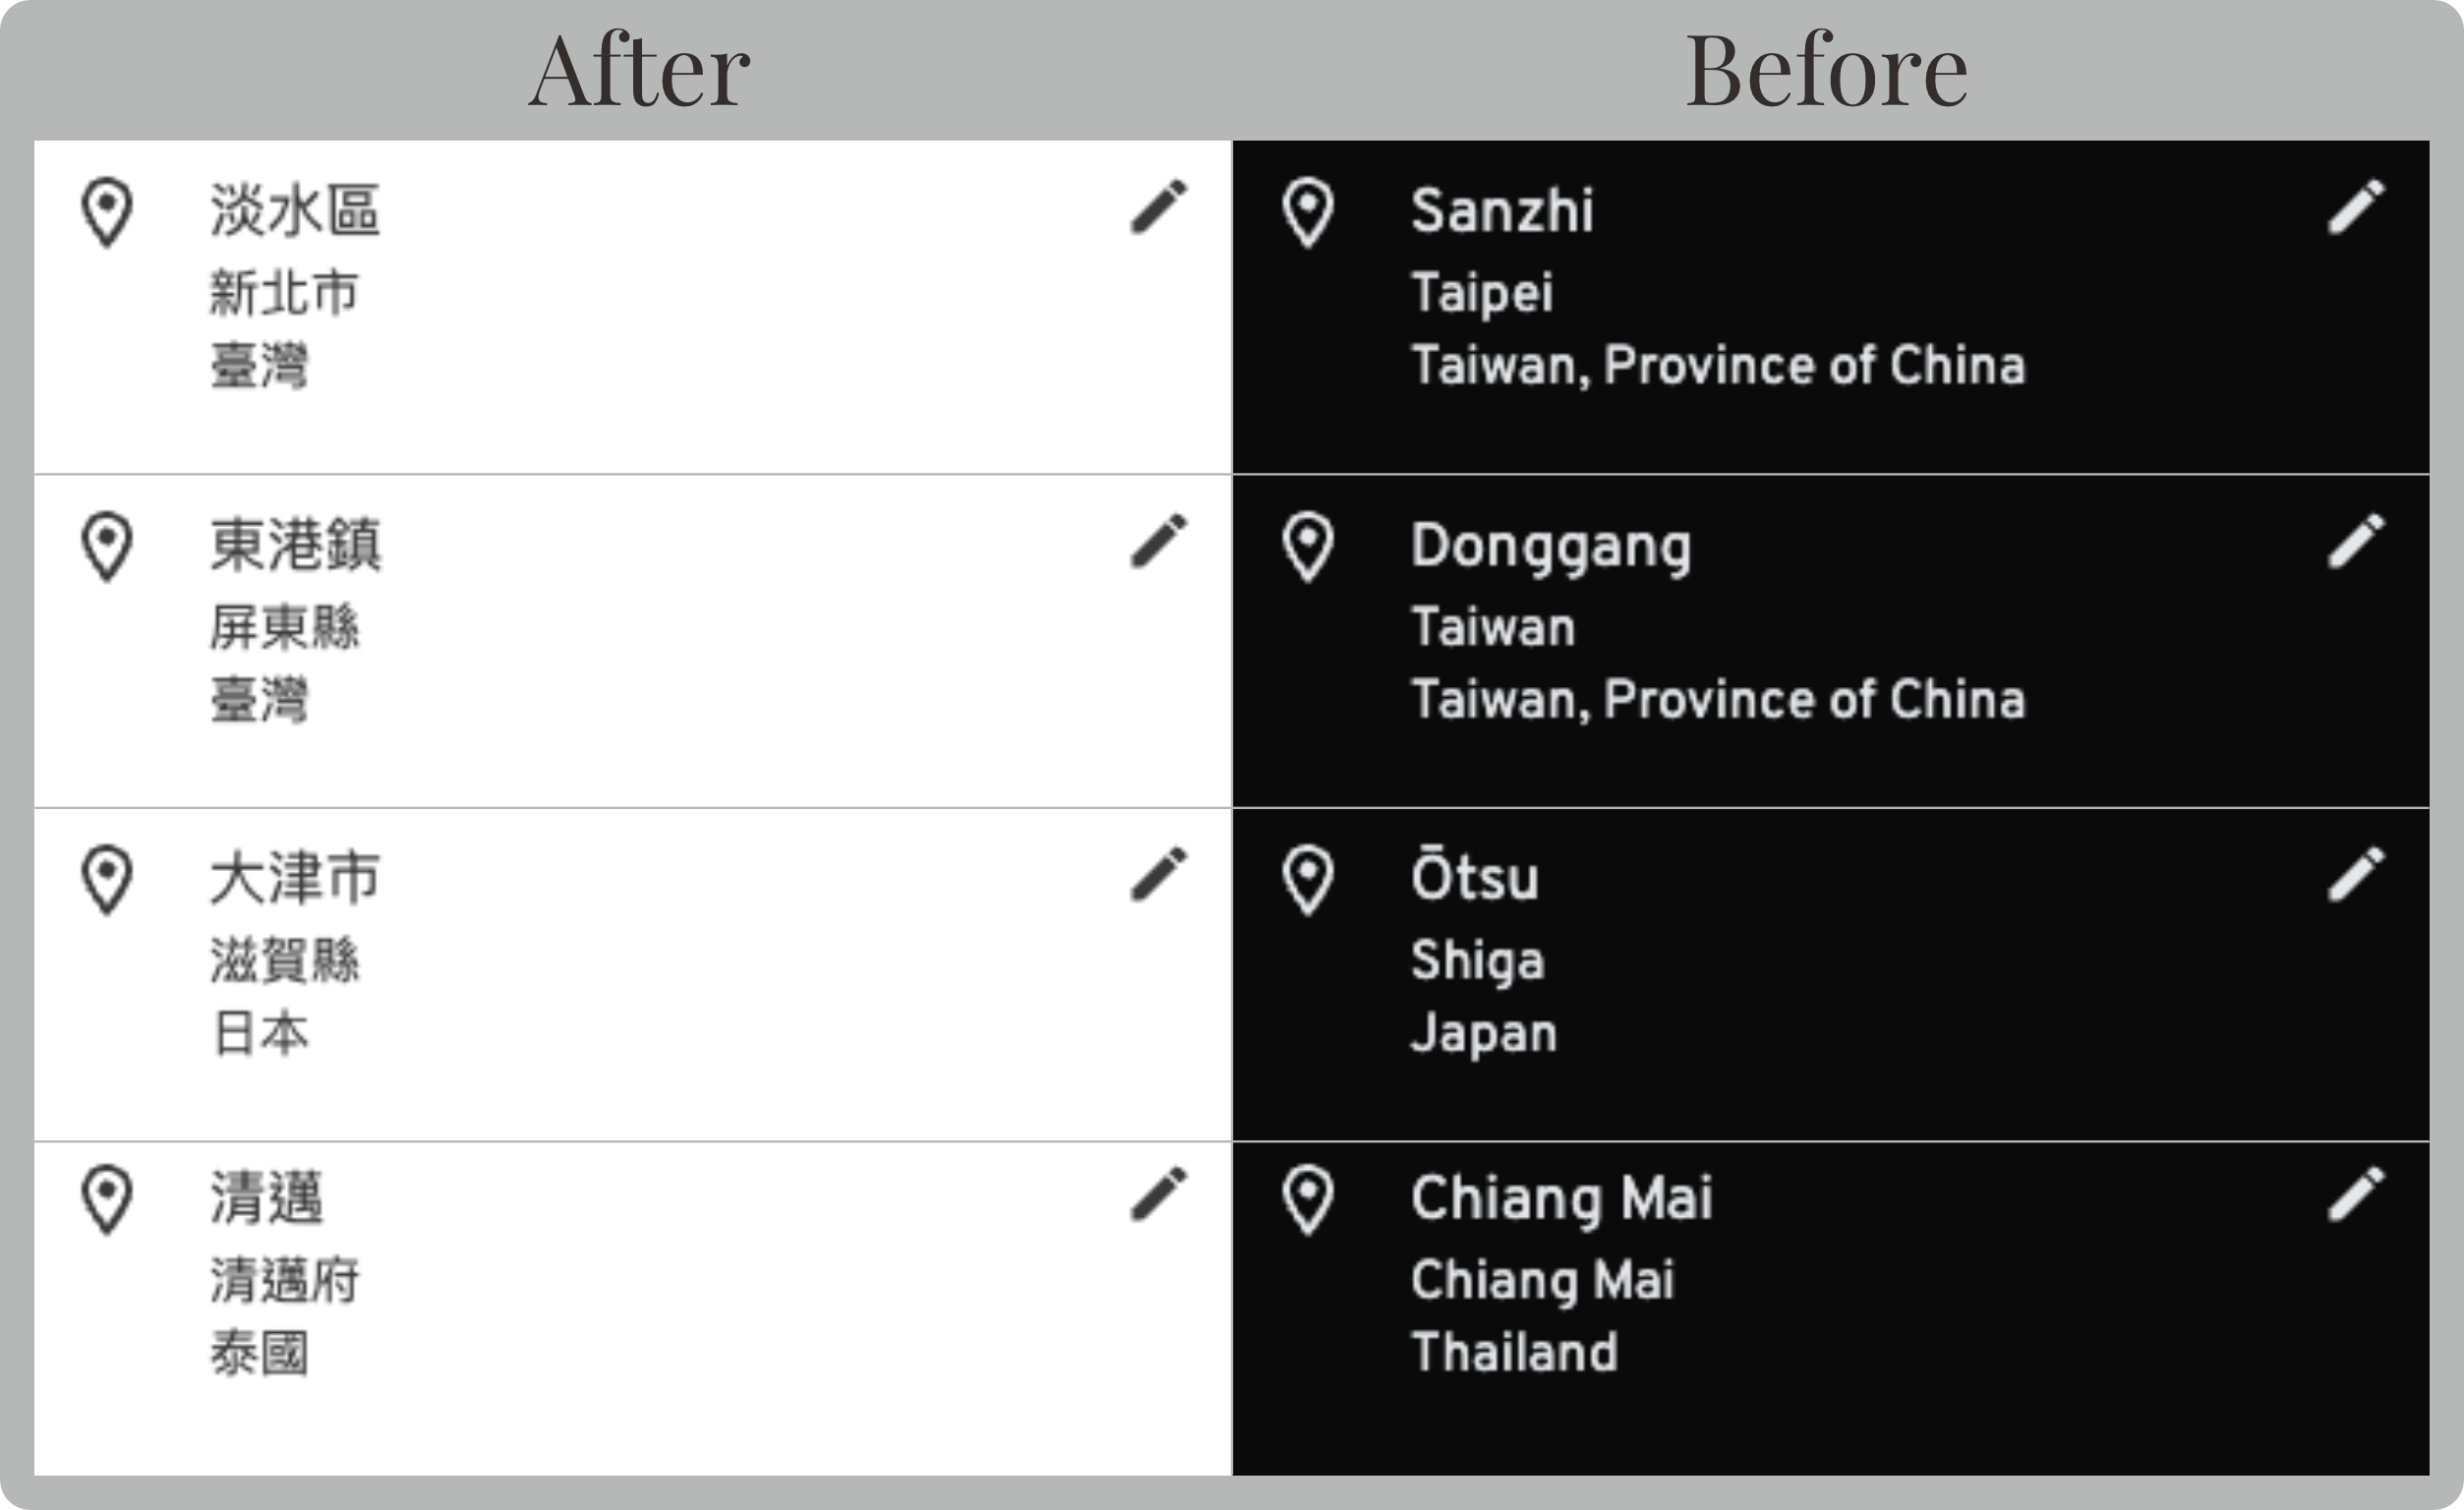
Photo location data is all in English. For example, Immich’s raw output shows “Sanzhi, Taipei, Taiwan, Province of China”.
Administrative levels are incomplete, so you cannot narrow a photo down to a township or district, and sometimes the location is simply wrong.
Non-English place names are unfriendly. Photos taken abroad often display only romanized script or imprecise English labels, lacking the kanji or Chinese translations that readers expect.
To solve these problems I built immich-geodata-zh-tw, which replaces Immich’s reverse geocoding database with one that matches what users in Taiwan actually expect to read.
Immich’s built-in reverse geocoding relies mainly on the global GeoNames database, which causes three problems for Traditional Chinese users:
English place names: no Traditional Chinese translations.
Incomplete administrative levels: only the county or city name, with no township or district level below it.
Imprecise place name resolution: without localized boundary data, the result is sometimes the wrong location entirely.
For example, a photo taken at Taipei 101 may show only “Taipei, Taiwan, Province of China” instead of “Taiwan, Taipei City, Xinyi District”. Likewise, Chiyoda in Tokyo becomes the romanized “Chiyoda, Tokyo, Japan” rather than 東京都千代田区.
This project fixes all of the above by importing official or open-source high-precision boundary data from each country and combining it with an automated translation pipeline.
If you want to know why swapping a few plain text files changes the place names Immich displays, see How Reverse Geocoding Works in the technical series.
The project centers on deep processing of official surveying and mapping agency geodata, paired with reverse geocoding queries and a global gazetteer to deliver tiered localization:
Region
Display style & localization features
Data source & processing method
🇹🇼 Taiwan
Completes full hierarchy from county/city down to township/district, and displays country and place names in Traditional Chinese
National Land Surveying and Mapping Center (NLSC) official vector geodata
🇯🇵 Japan
Preserves native kanji and kana familiar to readers (e.g., “横浜市”, “中区”)
National Land Numerical Information (KSJ) official vector geodata
🇰🇷 South Korea
Displays official Korean hanja orthography (e.g., “淸州市”), synchronized with latest 2026 administrative divisions
admdongkor administrative dong official vector geodata
🇹🇭 Thailand
Traditional Chinese translations, with official English and Thai as fallback
COD-AB (OCHA) official vector geodata
🇮🇩 Indonesia
Traditional Chinese translations, with official BIG Indonesian as fallback
Indonesian Geospatial Information Agency (BIG) village-level official vector geodata
🌏 Other regions
NAER official translation → GeoNames Chinese → original name
GeoNames global database
For Taiwan, on top of the Chinese names, the project also fixes the incorrect country name, fills in the many missing county and city names, and completes the full hierarchy from special municipality or county down to township and district.
Note
South Korean cities are shown using the official Korean hanja, for example 淸州市 rather than 清州市. Korean place names are hanja words to begin with, so the hanja is the original name rather than a translation. This follows the same logic as keeping Japanese kanji, and small glyph differences from the forms normally written in Taiwan are expected.
You can modify docker-compose.yml and restart containers
Integrated deployment requires the container to reach github.com at startup. If your environment has no outbound access, use manual deployment instead
You know your Immich version (this project supports v2 and v3. For manual deployment, the mount paths differ slightly between versions)
Your photos contain GPS data, otherwise Immich has no way to determine a location
Method A fits most people: if you deploy with Docker Compose and the container can reach GitHub, one added line in docker-compose.yml is all it takes, and the data stays updated automatically afterwards. If you have special mount requirements, or your environment has no outbound access to begin with, use method B and download the data yourself. If Immich is not running in a container at all (native macOS installs, LXC, or bare metal), go straight to “Other deployment methods”.
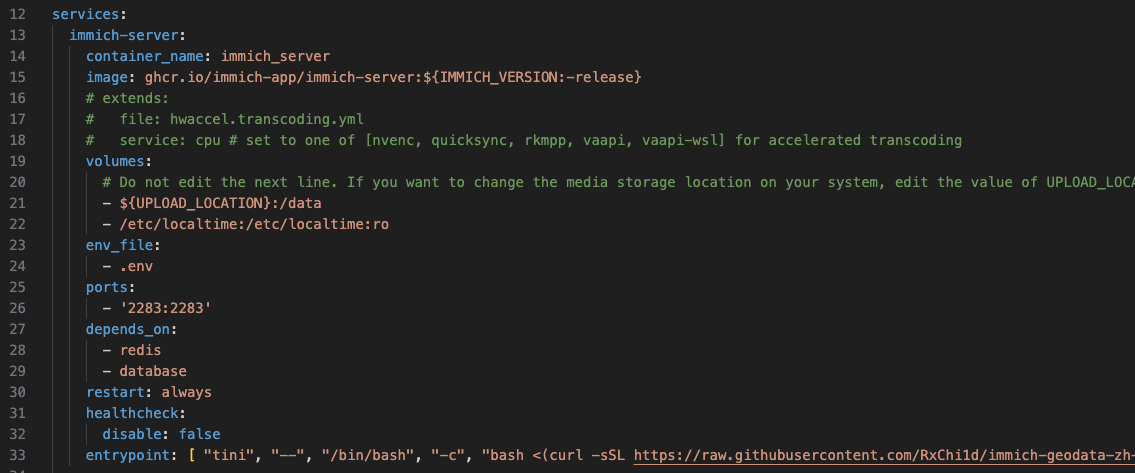
Add an entrypoint setting to the immich_server service:
services:immich_server:container_name:immich_server# ...remaining settings omitted# Note: releases/latest/download is used here to make sure a stable release is downloadedentrypoint:["tini","--","/bin/bash","-c","bash <(curl -sSL https://github.com/RxChi1d/immich-geodata-zh-tw/releases/latest/download/update_data.sh) --install && exec start.sh"]
Important
The command must end with exec start.sh. Writing it as exec /bin/bash start.sh prevents Immich v1.142.0 and later from resolving its own path, which sends the container into a restart loop.
Immich will not start if it cannot reach GitHub
&& is a short-circuit operator: if the download fails the script exits non-zero, exec start.sh never runs, and the container exits immediately. This is deliberate. It stops Immich from starting without the Chinese geodata, which would leave you thinking the localized place names were applied when they were not.
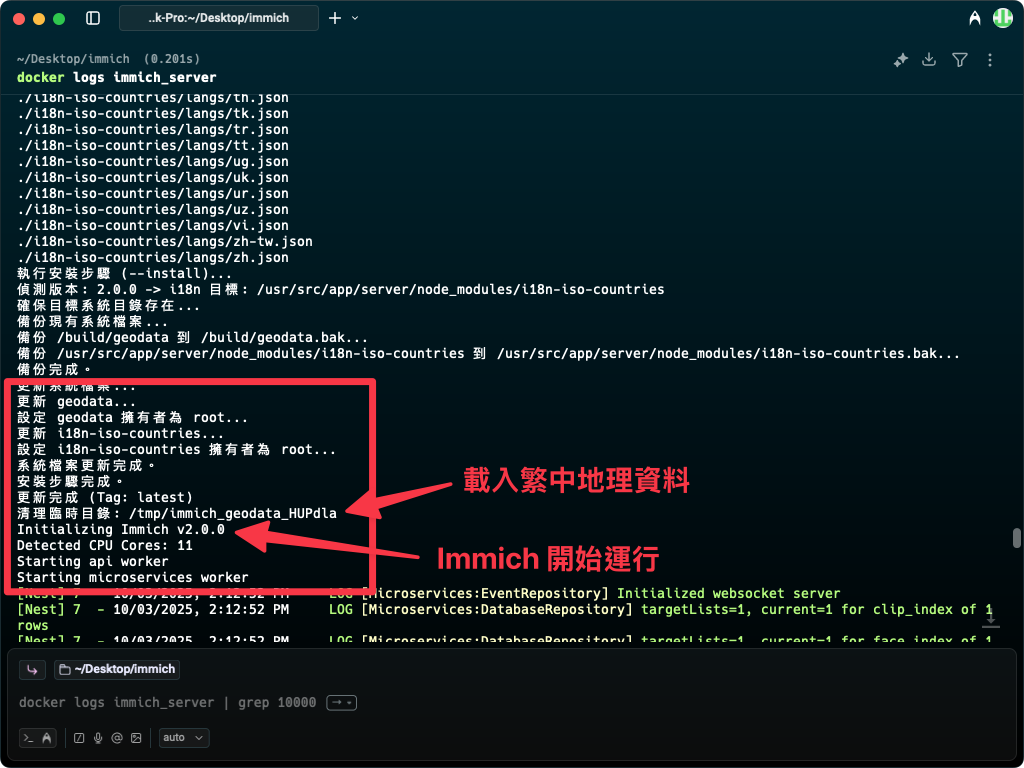
Whether the immich-geodata-zh-tw execution and download messages appear.
Output similar to the following means the script ran successfully:Checking the immich-geodata-zh-tw script outputIf the script ends by printing 驗證通過 (verification passed), the data really was written to the locations Immich reads from, including the file that determines how country names are displayed. This is a more reliable signal than searching the log for keywords.
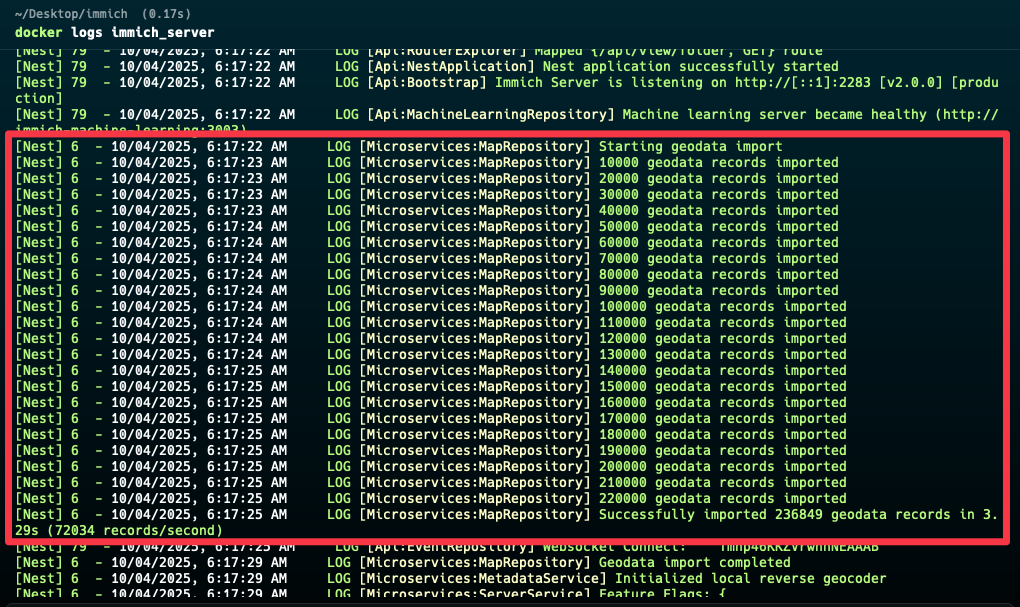
Whether Immich prints 10000 geodata records imported after it starts, which means the data loaded successfully.Checking the Immich geodata import result
No import message?
Immich compares the contents of geodata/geodata-date.txt against the record in its database and only re-imports when the two differ in content. It compares content, not which date is newer.
Integrated deployment reinstalls the data on every startup, so an unchanged date simply means the same dataset has already been imported. In that case, check that “Extract Metadata” was run with the “All” option and that your photos actually contain GPS data.
For manual and other deployment methods, you can change geodata/geodata-date.txt to something different from its current value (today’s date, for example) and restart Immich to force a re-import.
That completes the integrated deployment. If your Immich library already contains photos, one step remains: “Re-extract photo metadata”, which is what applies the new location data to existing photos.
The example above applies to Immich v3.3.0 and later, where country names are already included in geodata. Immich versions before v3.3.0 do not read countryInfo.txt; they get country names from the i18n-iso-countries locale file instead, so you need to mount that file as well (geodata is still mounted as usual). The path depends on the version:
Then edit the DOWNLOAD_DIR variable near the top of the script (it lives in the configuration block in the first part of the file, so searching for DOWNLOAD_DIR= will find it) and set it to the parent directory of the mount path above, which in this example is /path/to/your/immich. Then run:
bash update_data.sh
The result is the following structure, with no files to move by hand:
i18n-iso-countries is used only by Immich versions before v3.3.0; on v3.3.0 and later you can ignore it.
You can also download release.tar.gz or release.zip directly from the GitHub Releases page, extract it, and place the geodata folder in the mounted location.
Note
UnRAID users can run the script through the User Scripts plugin.
When upgrading Immich, manual deployments must re-download the data
In a manual deployment, geodata is mounted into the container by you and does not update with the Immich image. When you upgrade to v3.3.0 or later, run bash update_data.sh once more to get v3.3.1 or later data, otherwise Immich cannot read geodata/countryInfo.txt. Integrated deployment is unaffected because it reinstalls on every start.
Other deployment methods (native macOS worker, LXC, and bare metal) 🖥️#
The data can be installed even when Immich is not running in a Docker container, for example with immich-apple-silicon or in LXC. The only difference is that the commands must run on the machine running the microservices worker, because geodata is imported only when that service starts.
Before installing, it is worth having the script print the locations it intends to write to:
Once the paths look right, swap --print-paths for --install to perform the installation. If the paths are wrong, override them with IMMICH_SERVER_ROOT and IMMICH_BUILD_DATA. For details such as how to restart the macOS accelerator, and sudo considerations for LXC and bare metal, see the Non-container deployment section of the project README and the macOS accelerator configuration guide.
Final step (all deployment methods): re-extract photo metadata 📸#
After the data is imported you must re-extract metadata so that existing photos pick up the new location data. Newly uploaded photos get it automatically.
Tip
If your Immich library has no photos yet, for example because you just deployed it, you can skip this step.
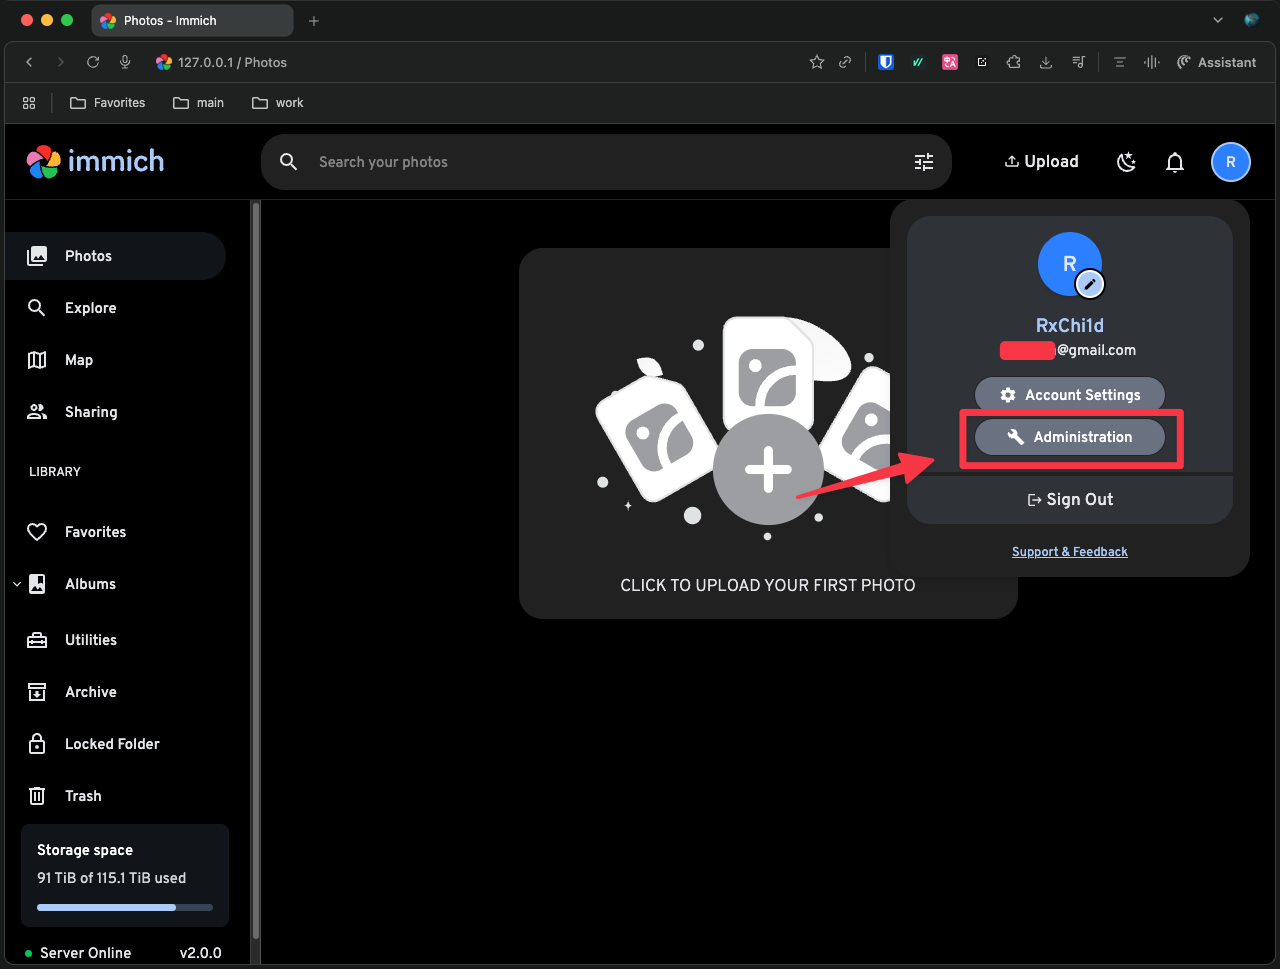
Log in to the Immich admin panelLogging in to the Immich admin panel
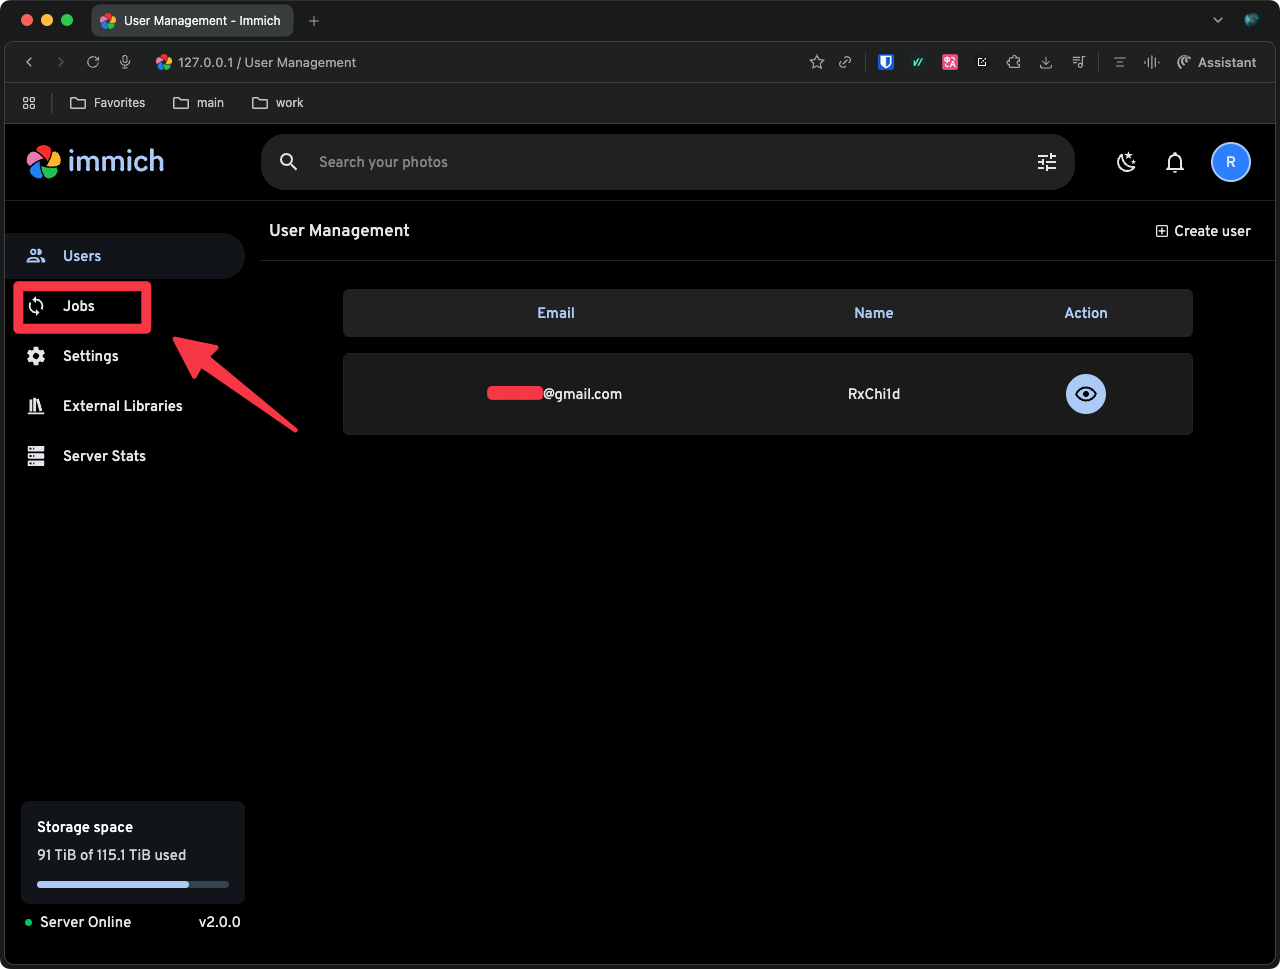
Go to Administration → JobsOpening the Jobs page under Administration
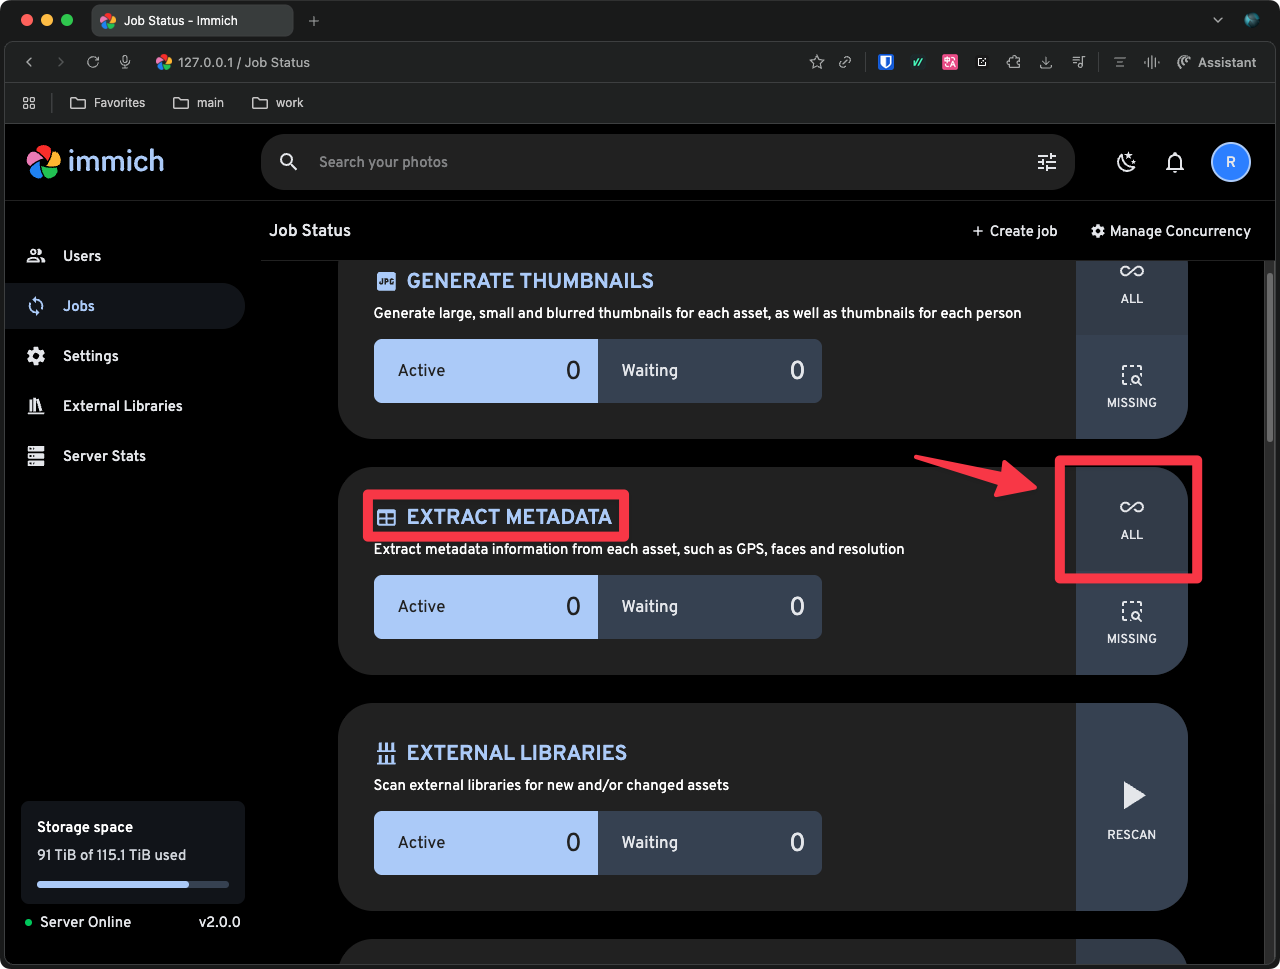
Find Extract Metadata and click AllSelecting Extract Metadata and clicking All
Location data on existing photos will now be updated to the localized place names, and new uploads will use them directly.
Metadata extracted, but the names did not change?
See “No import message?” to confirm whether Immich really re-imported the geodata.
If the latest release has a problem, or you want to stay on a specific version such as v3.3.1, use the --tag option. The script itself is always fetched from the latest release; --tag only determines the data version.
Integrated deployment:
Modify the command in entrypoint:
Do not change the script URL to releases/download/<tag_name>/update_data.sh. Automatically published releases such as nightly do not contain update_data.sh, so that URL returns a 404 and integrated deployment fails to start.
On Immich v3.3.0 and later, choose v3.3.1 or later
Earlier data does not contain countryInfo.txt. The script aborts before modifying any file, and the integrated deployment container fails to start as a result.
For the available versions, see the Releases page. If your environment has no outbound access, you can download release.tar.gz first and install it with --archive. Full option documentation is in the project’s update_data.sh usage guide.
Q: How do I update the data?
A: For integrated deployment, just restart docker compose and it updates itself. For manual deployment, run bash update_data.sh again and restart the container. For other deployment methods, run the same --install command again and restart the Immich service. After updating, remember to re-extract metadata if needed.
Q: There is no import message and the localized names are not applied.
A: Check the log for geodata records imported. If it is missing, see “No import message?” to review the import conditions. Do not forget to re-extract metadata.
Q: County and city names are now in Traditional Chinese, but the country name is still in English.
A: This usually happens when you run Immich 1.136.0 or later together with an immich-geodata-zh-tw version older than v1.2.0. Using the latest release (the default) or any version from v1.2.0 onwards resolves it.
Q: The container keeps restarting with main.js not found.
A: This typically happens on Immich v1.142.0 and later, because Immich changed the name of its startup file. If you are still using an older entrypoint command (anything containing exec node dist/main or exec /bin/bash start.sh), update the entrypoint in your docker-compose.yml as shown in “Method A: Integrated deployment 🚀 (recommended)”.
Q: After upgrading to Immich v3.3.0 the container keeps restarting, and the log says the i18n-iso-countries package cannot be found.
A: Immich v3.3.0 removed that package, and the older script exits when it cannot find it. Restart the container and it recovers: integrated deployment fetches the latest update_data.sh on every start, and your photos do not need their metadata re-extracted. If the --tag in your entrypoint is pinned to a version before v3.3.1, change it to v3.3.1 or later, or remove it. See “Pinning a specific version”.
Q: Some photos show a location that differs from where they were actually taken.
A: Immich matches place names by nearest distance, so coordinates near an administrative boundary can be assigned to the neighbouring district, and small islands or unusual terrain may not map precisely either. This is a consequence of how Immich resolves locations, not an error in the data. For how this nearest-neighbour lookup works, see How Reverse Geocoding Works.
Q: How do I remove this and restore the original place names?
A: For integrated deployment, delete the entrypoint line from docker-compose.yml. For manual deployment, remove the volume mounts you added. After restarting the container Immich falls back to the official GeoNames data (if the change does not take effect immediately, it is the same geodata/geodata-date.txt comparison issue), and a final metadata re-extraction finishes the job.
By integrating official survey geodata, reverse geocoding queries, and localized translation dictionaries, immich-geodata-zh-tw makes travel locations in photo libraries read naturally for Traditional Chinese users.
If you want to know how this geodata is actually produced, including which files Immich reads, how each country’s boundary data is processed, and how place names are translated and verified, the technical series walks through the entire pipeline. Start with How Reverse Geocoding Works.
If you find this project useful, a star ⭐ on GitHub is always appreciated.